Making Your Terminal Awesome
The tools we use as developers make us more effective (or at least hopefully faster) developers. So why not spend some time to make one of the most common dev tools much more useful? Here's a way to give any terminal app a personalized and awesome experience (fwiw I use the default app included with macOS). Features covered will be the following:
- a super informative and customizable prompt
- per-directory prompt customization
- automatic switching of Node.js versions (easily extended to any run-time)
- better auto complete and history
- optional "command done" chime
I'll add, each main feature discussed below is independent of each other. Meaning, you can pick individual features to add to your terminal.
Also, I use Z Shell so, except when noted, this post is specifically about Z shell implementations.
Homebrew
If you're on a Mac and you don't already have Homebrew, I recommend using it for installing packages on a Mac. It's always been great for me and it is widely supported. The following sections do not require Homebrew, but some will be easier with it.
Installation instructions are here: https://brew.sh. Homebrew is also on GitHub: https://github.com/Homebrew/brew
Informative and Personalized Prompt
Here's my customized terminal prompt, enabled through Starship:
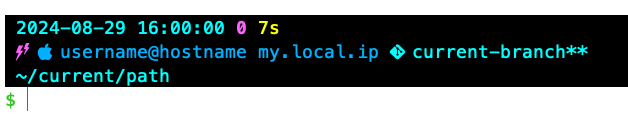
It has the following features:
- first line
- date
- 24 time
- exit code of the last command that ran (in magenta)
- how long it took for the last command to run (in yellow)
- second line
- an icon indicating that sudo is currently active (in magenta) (this is hidden when sudo is not active)
- an Apple icon since I'm on my Mac
- I choose a different icon for each device, like a Raspberry for prompts on my Raspberry Pi.
- This icon won't be as useful to you if you only use a single device.
- current username and host
- This is likely only useful if you switch users and/or devices frequently.
- the device's local IP address
- the current repo's git branch (if in a git repo)
- if there are currently uncommitted changes in the repo (indicated by the asterisks
*)
- third line
- current directory
- fourth line
- prompt entry symbol (
$) which changes color based on whether the previous command failed (red) or succeeded (green) - the cursor
- prompt entry symbol (
Here's how to set this up:
- Install Starship: https://github.com/starship/starship?tab=readme-ov-file#step-1-install-starship.
- Optional: choose and install a "Nerd Font" so you can use icons in your terminal: https://www.nerdfonts.com/font-downloads
- Add
eval "$(starship init zsh)"to your~/.zshrcfile - Create the file
~/.config/starship.toml
After that, you can read up on how to customize Starship to your liking here: https://starship.rs/config/. I've included my own custom config below, which results in a prompt that looks like my above screenshot.
Click to expand starship.toml
format = """
[ $time\
$status\
$cmd_duration\
$fill\
$line_break \
$sudo\
$username\
$hostname\
$localip\
$git_branch\
$git_status\
$git_state\
$fill\
$line_break \
$directory\
$fill\
$line_break\
](bg:0)\
$jobs\
$character\
"""
[cmd_duration]
min_time = 0
format = "[$duration]($style) "
style = "bg:0 226"
[time]
disabled = false
format = "[$time]($style) "
style = "bg:0 51"
time_format = "%Y-%m-%d %T"
[status]
success_symbol = " "
format = "[$int]($style) "
disabled = false
style = "bg:0 bold 207"
[directory]
style = "bg:0 51"
truncate_to_repo = false
truncation_length = 20
truncation_symbol = "…/"
[git_branch]
symbol = " "
format = "[$symbol$branch]($style)"
style = "bg:0 51"
[git_status]
conflicted = "*"
ahead = ""
behind = ""
diverged = ""
up_to_date = ""
untracked = "*"
stashed = ""
modified = "*"
staged = "*"
renamed = "*"
deleted = "*"
format = "[$all_status]($style) "
style = "bg:0 51"
[character]
success_symbol = "[\\$](34)"
error_symbol = "[\\$](196)"
[git_state]
style = "bg:0 bold 207"
format = "[$state \\($progress_current/$progress_total\\)]($style)"
[username]
show_always = true
format = "[ $user]($style)"
style_user = "bg:0 39"
style_root = "bg:0 bold 207"
[hostname]
format = "[@$hostname]($style) "
trim_at = "."
# I set a different color here for each host
style = "bg:0 39"
ssh_only = false
[localip]
ssh_only = false
disabled = false
style = "bg:0 39"
[sudo]
format = "[$symbol]($style)"
symbol = " "
disabled = false
style = "bg:0 207"
[fill]
symbol = " "
style = "bg:0"
Per-dir Prompt Customization
This will allow you to automatically switch your Starship config per directory. For example, I switch the main prompt color when in my work's repos vs in my personal repos.
-
create a copy of your default Starship config (from
~/.config/starship.toml) and customize it to your liking -
move that new Starship config into the directory in which you want it to be used
-
add the following code to your
~/.zshrcfile:Click to expand
.zshrcThis adds a
cdhook which will try to find and switch to, if found, a customstarship.tomlfile.autoload -U add-zsh-hook
change-starship-config() {
# extended globbing
setopt extended_glob
# find a starship.toml file in parent directories
local starshipConfig="$((ls (../)#starship.toml(:a)) 2>/dev/null)"
if [ -e "$starshipConfig" ]; then
if [ "$STARSHIP_CONFIG" != "$starshipConfig" ]; then
echo "Local starship.toml found: switching to it now."
export STARSHIP_CONFIG="$starshipConfig"
fi
else
unset STARSHIP_CONFIG
fi
unsetopt extended_glob
}
add-zsh-hook chpwd change-starship-config
change-starship-config
# Make sure that this line is _after_ the above code
eval "$(starship init zsh)"
Now Starship will automatically use the closest starship.toml in your current or parent directory! (Or default to your main config in ~/.config/starship.toml.)
Automatic Node.js Version
This will automatically switch your terminal's Node.js version based on each directory's configuration. This makes switching between personal projects on the bleeding edge (using the latest Node.js version) to more stable work projects (requiring LTS Node.js versions) a breeze.
-
make sure you have
nvminstalled:nvm -v- if not, installation instructions are included here: https://github.com/nvm-sh/nvm?tab=readme-ov-file#install--update-script
-
add a
.nvmrcfile that only contains the Node.js version to each repo that needs a custom Node.js version- example:
.nvmrcfile with only the contents22
- example:
-
add the following code to your
~/.zshrcfile:Click to expand
.zshrcThis adds a
cdhook which will try to find an.nvmrcfile and, if found, use nvm to switch to that Node.js version for the current shell session. This will also download the Node.js version if it is missing.# these two lines are nvm init code which you may already have
# they must be _above_ the code below
export NVM_DIR="$HOME/.nvm"
[ -s "$NVM_DIR/nvm.sh" ] && \. "$NVM_DIR/nvm.sh"
# place this after nvm initialization!
load-nvmrc() {
local node_version="$(nvm version)"
local nvmrc_path="$(nvm_find_nvmrc)"
if [ -n "$nvmrc_path" ]; then
local nvmrc_node_version=$(nvm version "$(cat "${nvmrc_path}")")
if [ "$nvmrc_node_version" = "N/A" ]; then
nvm install
elif [ "$nvmrc_node_version" != "$node_version" ]; then
nvm use
fi
elif [ "$node_version" != "$(nvm version default)" ]; then
echo "Switching to default node version"
nvm use default
fi
}
add-zsh-hook chpwd load-nvmrc
load-nvmrc
Now whenever you change directories, your terminal will automatically switch Node.js versions if necessary!
Click to expand the bash alternative
This overrides the cd command so that it will try to find an .nvmrc file and, if found, use nvm to switch to that Node.js version for the current shell session. This will also download the Node.js version if it is missing. (Thanks to @KylerHansen for finding this!)
load-nvmrc() {
    echo "Attempting to switch node version"
    local node_version="$(nvm version)"
    local nvmrc_path="$(nvm_find_nvmrc)"

    if [ -n "$nvmrc_path" ]; then
        echo "Found .nvmrc file"
        local nvmrc_node_version=$(nvm version "$(cat "${nvmrc_path}")")

        if [ "$nvmrc_node_version" = "N/A" ]; then
            nvm install
        elif [ "$nvmrc_node_version" != "$node_version" ]; then
            nvm use
        fi
    elif [ "$node_version" != "$(nvm version default)" ]; then
        echo "Switching to default node version"
        nvm use default
    fi
}
cd() {
    load-nvmrc
    builtin cd $@
}
load-nvmrc
Better auto-complete and history
Use Oh My Zsh to provide better autocompletion and command history. This is by far the most heavy-weight and time consuming part of this blog post. Oh My Zsh has tons of default configurations which drive me crazy and I had to disable, though I don't remember anymore what exactly I disabled 🙃.
Install Oh My Zsh here: https://github.com/ohmyzsh/ohmyzsh?tab=readme-ov-file#basic-installation
As for disabling parts of Oh My Zsh, I was able to find answers on how to disable each feature I disliked by searching for them online.
Command Done Chime
Most people will probably find this incredibly annoying, but I find it very useful for long running processes (like running local tests that take 5-10 minutes).
On a Mac, simply add the following code to your ~/.zshrc file:
precmd() { ( play --no-show-progress --single-threaded -v 2 /System/Library/Sounds/Glass.aiff & ) }
There are many other sounds in /System/Library/Sounds to choose from, and of course you can download any sound you wish and use it here.